5. LAUV Console
From the LAUV Console it is possible to create missions from scratch, including environmental map features and plan specifications, as well as monitor the vehicle’s execution and review data collected in previous missions.
Before doing anything else, the console should have a loaded mission, either pre-existing or a newly created one.
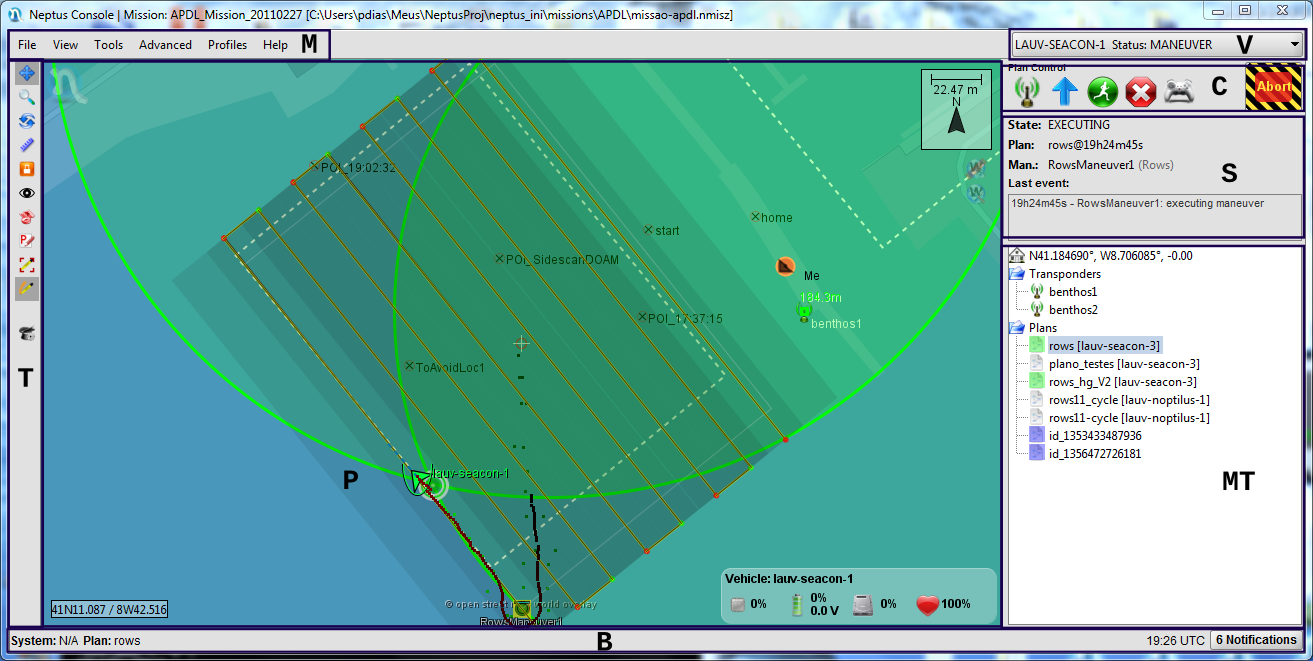
The console is divided into several sections as can be seen in the figure.
5.1. Main Vehicle
One important concept to grasp is the notion of main vehicle. The console can handle multiple systems at the same time
but it is important to have a notion of what system we want to send commands to.
So the main vehicle of the console is the selected/target vehicle to the actions fired from the console.
The information of what is the main vehicle can be found on the bottom bar of the console and can be seen and also
changed from the combo box that appears on the top right of the console.
5.2. Console Central Panel
The console shown in the figure, is a console targeted at operating the
LAUV AUV. We can look at this console by dividing it in two, the left and right sides.
On the left we see the map. In this component we can find the virtual representation of
mission site. For the map tiles, the user can choose from several sources like Open Street
Map, Google Maps, or Virtual Earth (tiles are cached for offline use).
S57 nautical charts are also available but for this option, nautical charts are loaded from
disk while on the former they are loaded from the Web. On the left of this components you find a tool bar.
In it you find some tools to modify and operate the map (like pan, zoom, rotate, and measure tools) and
some that allow edition of the mission map, edit or generate mission plans and others (see section
sec_toolbar).
On the right-hand side of the interface, the console provides several planning components and commands.
On the top, a combo box makes it possible to change the system currently being controlled (see Main Vehicle Selector).
Below, the plan control buttons allow operators to send and execute mission plans
and monitor the state of execution of active plans in the panel below.
The tree in right is called the mission tree and there is where the operators can
find and edition the mission elements (beacon locations, mission plans and static base location).
These elements allow a suitable command of the AUV.
Moreover, several less used widgets can be shown/hidden in pop-up dialog windows by using accelerator keys. This
was added in order to access more detailed information quickly as needed.
In the map panel in the figure, we can see a mission plan which consists of two rows
(lawnmower pattern) interleaved with goto maneuvers.
When editing a plan, the operator can select from the set of the vehicles’ feasible maneuvers
and build a plan by adding maneuvers and creating transitions between them (Neptus creates a
sequencing transition as default). For each maneuver, a set of maneuver-specific parameters,
together with vehicle-specific payload parameters can be set in order to use, or disable, vehicle
payloads or configure some other parameter of the vehicle.
These console components can be view in detail on Neptus Elements.
5.4. Bottom Bar
In the bottom bar you can find some info of what vehicle is the main vehicle, the mission plan
that is selected, the UTC clock, and the notifications area.
The notifications area is where you can find the latest notifications of the console and vehicles.
Check the Notifications for more information on this.
 In some configurations or Neptus distributions you can save the console or save another console
configuration in the File menu.
In some configurations or Neptus distributions you can save the console or save another console
configuration in the File menu.